Friday, April 4, 2014

How to Install Drupal On Your Hosting Account

In order to install the Drupal CMS application, please follow the step-by-step instructions below:
STEP 1Download the installation file from Drupal.org by choosing the latest stable version and clicking on the download link next to the package.
STEP 2Upload it in the public_html folder of your account. You can do that through an FTP client like FileZilla or via cPanel -> File Manager -> Upload file(s). This way, after the installation is completed, the script will appear once your write something like http://yourdomainname.com in your web browser. Or you can create a subfolder there and upload the file in it. The Drupal installation will be available at: http://yourdomainname.com/subfolder.

How to use Drupal?

In this tutorial we will show you the basic actions you need to take in order to start a new Drupal-powered website.

How to start a Drupal site?

All you need to do is sign up for a hosting account where you can have the Drupal application installed. Here at SiteGround we offer a FREE Drupal installation! With our Professional Drupal hosting package you can start creating your site right away! If you already have a hosting account and would like to change your host, we offer free website transfer of your Drupal site.

How to install/enable Drupal modules

You can enable/disable Drupal Modules from the Drupal Administration area -> Modules section.
undefined
The default installation of Drupal has many useful modules, and there is a brief description of what each one of the modules does. If you need more modules, you can freely download them from the Drupal Modules official website.
On your site, Drupal modules are stored in the modules subfolder within the Drupal installation directory. You can install additional modules by simply unzipping them in that folder. Alternatively, you can use the Install new module functionality.

How to change the default Drupal theme?

How to change the default Drupal theme?

The default Drupal installation comes with several themes which can be changed from your administration area. Log in as an administrator,click on Administer -> Appearance and choose which theme you want to use for your website.

How to Manage Users in Drupal

You can manage users' rights from the Drupal Admin Section -> People.
People

How to optimize Drupal?

There are several steps that you should follow in order to improve the performance of your Drupal-based website:
First, you should enable the caching system of your Drupal application. In order to do this, login as administrator and go to the Administer -> Site Configuration -> Performance menu. In it, set the values of Caching Mode to "Normal" and Block Cache to "Enabled". Then, click on the "Save configuration" button at the bottom of the page.

Search Engine Friendly URLs

Don't have a Drupal website or have problems with your current host?Check out the best Drupal hosting service (including a free installation)! 

Here we will try to explain how you can enable the clean URLs in Drupal in three simple steps. All SiteGround servers fully support the Apache mod_rewrite module and all Drupal users hosted on our servers will be able to use the clean URLs option.
There are only 3 steps you need to follow to enable the Search Engine Friendly URLs.Here we assume that you already have Drupal installation for your account into the /drupal subfolder (www.yourdomainname.com/drupal) and you want to activate the clean URLs.
STEP 1Edit the .htaccess file in your Drupal directory.
Delete the entire content of the .htaccess file and insert the following lines into it:

Using Drupal Taxonomy to Post Content

Now that we have created the vocabulary and we have added terms to it, we can use it when posting content on the web site.

Access Control in Drupal CMS

The access control list in the Drupal's admin panel -> People -> Permissions is quite self-explanatory.
There you can modify the predefined permissions for the different user types (anonymous, authenticated and administrator).

How to Add A Free Live Chat in WordPress

There are some wonderful live chat options available for WordPress. However, most of them are paid and the free ones are not so great. Live chat can be used to answer customer queries, interact with visitors, provide support for products and services. In this article we will show you how to add free live chat in WordPress. We will look at some solutions that are free, reliable, and efficient.

How to Add a jQuery FAQ Accordion in WordPress

What is Accordion?

In web design, accordion is a term used for a user interface design pattern that has tabs or content blocks which collapse or expand upon user interaction. Each tab has content below them which expands when the user clicks on the menu item. In simple terms, it is like a menu that expands when you click on it. We have used a similar effect on our free WordPress blog setup page. Below is a screenshot of a sample accordion.

How to Add the Facebook Like Box / Fan Box in WordPress

Facebook like box also known as Facebook fan box has become a must have element for many website. It allows website owners to provide their users with an easy way to join their facebook community and get updates right in their Facebook news feed. Recently one of our users brought it to our attention that we have not covered the topic of how to add the facebook like box in WordPress. Although we have covered how to add the facebook like buttonfacebook send button, andfacebook comments. In this article, we will show you how to add the facebook fan box in WordPress.

How to Use Masonry to Add Pinterest Style Post Grid in WordPress

In this tutorial, I will show you how to use the popular Masonry JavaScript Library to create cascading grid layouts for your blog index, as well as archive pages for your theme. I will address a few issues that you need to consider for mobile-optimization and how to solve them.
Screenshot of Masonry Grid Layout in WordPress
 Note: This is an advanced level tutorial for those who feel comfortable editing WordPress themes and have sufficient HTML/CSS knowledge.

How to use Thumbnails with Previous and Next Post Links in WordPress

How to use thumbnails for previous/next post navigation in WordPress. The next_post_link and previous_post_link functions doesn’t have a simple enough thumbnail parameter which a new developer can simply turn on and off. In this article, we will show you how to use post thumbnails with previous and next post links in WordPress.
The final result would look like this:
Use Thumbnails with Previous and Next Post links in WordPress

Error: Server not Found

It happens. Sometimes we see this page when we try to load our site:
dreadpage1.5

Error: xml file is missing in package (joomla)

Receiving the “xml file is missing in package” error is common when installing a new template. This article contains a list of things you try to troubleshoot in order to find a solution for this error.
  • Try this first! Check whether or not the template you downloaded and installed is designed for the instance of Joomla! that you re using. For instance, if the template was created for Joomla! 1.5, you will absolutely not be able to install it on Joomla! 1.7, and vice versa.
  • If that doesn’t work, try this next! Another reason for this issue could be that the archive (or ZIP file) that you are trying to install contains the actual installation package (i.e. there is an archive within the archive). The solution is simple – you should extract the archive and install the actual installation package.
If you’re still having issues after troubleshooting, don’t hesitate to submit a support ticket in the Client Area.

URL Error: Numeric Values in URL (joomla)

How to delete a trashed Article

The first step is to delete any or all trashed Articles from the Article Manager. To do this, go to the Article Manager and select "Trashed" from the Status drop down menu item to view the "Trashed Articles". Click on the box next to the name of each Article, and click on the Empty trash button in the toolbar to delete each Article permanently. 
trashart3

Thursday, April 3, 2014

URL Error: Removing "index.php " from a URL

Rewrite engines are little pieces of software that rewrite URLs for different pages within a website in order to make the URLs more "relevant-looking" and representative of content on particular pages. Joomla! features a rewrite engine, and sometimes this engine adds "index.php" to the URL. The result is a URL that may look something like the following: 

http://www.yoursite.com/index.php/category/article

A lot of clients would prefer that "index.php" be removed from the URL so it looks cleaner like the following:

http://www.yoursite.com/category/article

This article offers steps to remove the "index.php" from the URL. There are two parts to the process: a few settings made in the Administration area (the back end) of the site, and some changes to one of the sites s primary folders. The second part will require the use of file transfer protocol (FTP). If you are unfamiliar with FTP, there are additional resources at the end of this document that can offer some guidance.

Global Configuration settings in the back end

Changes to the htaccess file using FTP

Related Resources

Global Configuration settings in the back end

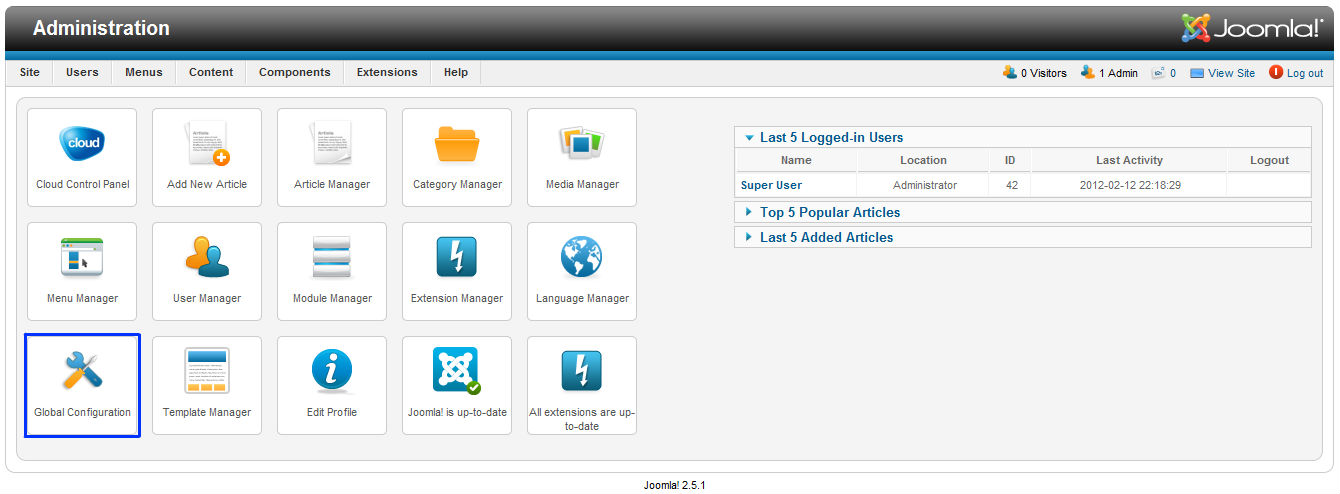
After logging into the back end of your site, go to Global Configurations.
index1

JCE: Missing JCE Editor (Joomla 2.5)

The Issue

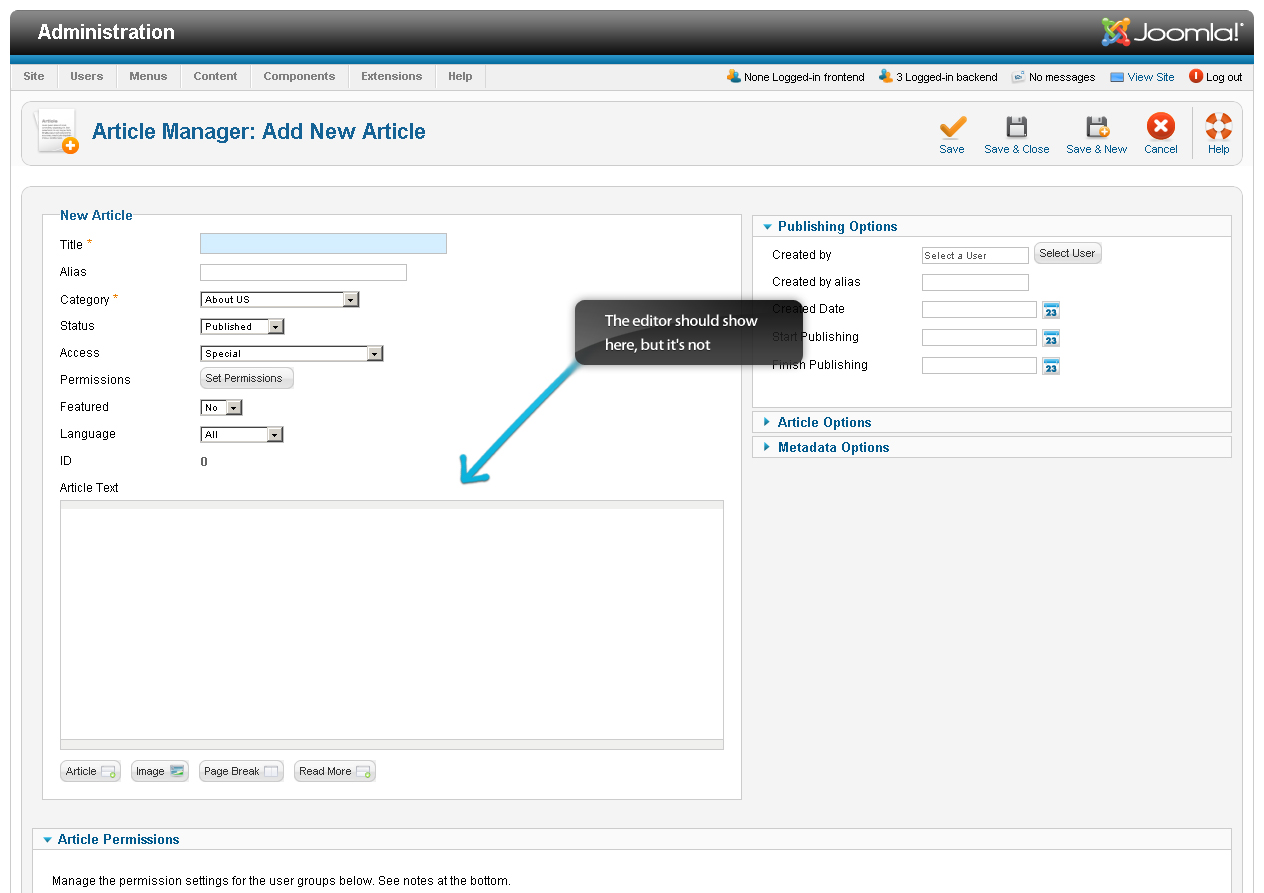
Occasionally users will attempt to create a new article or edit an existing article, but the JCE Editor that they installed doesn t show up (as illustrated in the screenshot below).
jce1

Common htaccess rules

The htaccess file is an important configuration file that sits in the root directory of your Joomla Instance. The htaccess file can be used to override certain server configuration settings or provide or block access to the site or directories. It even has useful URL rewriting capabilities. Below you fill find common uses for the htaccess file.
IMPORTANT: Making modifications to the htaccess file can potentially disable or break your Joomla Instance. The CloudAccess.net Support Team does not provide troubleshooting outside of what is listed below.

Android Futures: Creating Android Apps For Google TV

Google IO 2011 took place in early May in San Francisco, California. In the midst of many announcements and tons of information, Android development for Google TV did get a little coverage. As of this writing, most developers cannot yet use Google TVs as a target device for development, but this is about to change. Developers looking to get a head start can follow a few easy tips and be ready when consumers can download applications for their TVs.
Existing Google TV devices are scheduled to be upgraded to Android 3.1, a Honeycomb variant, this summer (2011). The Android Market for Google TV will come with this upgrade, making this a hot new Android platform that developers want to prepare for. There are several key differences between Google TV devices and traditional, portable Android devices, such as phones and tablets. Most of the tips involve accounting for these differences.

Android Fundamentals: Status Bar Notifications

Often times, applications will perform some background operation—maybe while the app is running or maybe triggered on a scheduled alarm. The user won't know what's going on, though, unless they are informed of some event. Luckily, Android has an easy notification system that allows applications to display a message in the status bar and provide informative details to the user when something important occurs.
In this tutorial, we'll extend the existing unnamed "TutList" application to notify the user when the scheduled download of tutorials has taken place. When the user taps on the notification in the status bar, the application will be launched. This way, we use notifications to provide feedback to the user that something has happened, while also reminding he user of the existence of the application and that fresh content is available.

Android User Interface Design: Building Application Preference Screens

Many applications can benefit from Shared Preferences – the Android platform’s answer to the persistent storage of application settings. There are many ways to create user interfaces for collecting and displaying persistent settings for users. The easiest way is to use the PreferencesActivity, which provides a consistent look-and-feel with the rest of the platform, including the device system preferences. Learn how to use PreferencesActivity in this tutorial.

Our simple Mobiletuts tutorial feed reader application, which doesn't have an official name yet (we've been referring to it as TutList), needs better user control over the background updating process. Therefore, we'll add a single preference to help control the background updating.
This tutorial builds upon previous tutorials, including Android Essentials: Application Preferences and the continued series on our TutList activity with the most recent tutorial,Android Fundamentals: Scheduling Recurring Tasks. If you have trouble keeping up, feel free to post questions in the comment section -- many folks read and respond, including ourselves. Also, don't forget about the Android SDK reference.
The final sample code that accompanies this tutorial is available for download as open-source from the Google code hosting.

Android Fundamentals: Scheduling Recurring Tasks

Many applications have a need for regular, background actions to take place. For instance, in the "TutList" application we've been building over a recent series of tutorials, the content list is stale until the user initiates a refresh from the options menu. Why can't the application simply update its data at regular intervals? Well, it can and it should. Let's implement this new feature right now!
In our last tutorial, Android Fundamentals: Downloading Data With Services, you learned how to download data off the UI thread and independent of any particular activity. This is an efficient way to download data, while avoiding duplicate downloads and restarts. Now you're going to learn how to download content without the user even asking.

Android Fundamentals: Downloading Data With Services

The tutorial content of the still-unnamed "TutList" application we've been building together is getting stale. The data has been the same for over a month now. It's time to breathe some life into the application by providing it with a means to read fresh Mobiletuts tutorial data on the fly.
As it stands now, our application reads a list of tutorial titles and links from a database. This is, fundamentally, the correct way to design the app. However, we need to add a component that retrieves new content from the Mobiletuts website and stores new titles and links in the application database. This component will download the raw RSS feed from the site, parse it for the title and link, then store that data into the database. The database will be modified to disallow duplicate links. Finally, a refresh option will be placed within the list fragment so the user can manually force an update of the database.
As with other tutorials in this series, the pacing will be faster than some of our beginner tutorials; you may have to review some of the other Android tutorials on this site or even in the Android SDK reference if you are unfamiliar with any of the basic Android concepts and classes discussed in this tutorial. The final sample code that accompanies this tutorial is available for download as open-source from the Google code hosting.