Friday, April 4, 2014

How to Install Drupal On Your Hosting Account

In order to install the Drupal CMS application, please follow the step-by-step instructions below:
STEP 1Download the installation file from Drupal.org by choosing the latest stable version and clicking on the download link next to the package.
STEP 2Upload it in the public_html folder of your account. You can do that through an FTP client like FileZilla or via cPanel -> File Manager -> Upload file(s). This way, after the installation is completed, the script will appear once your write something like http://yourdomainname.com in your web browser. Or you can create a subfolder there and upload the file in it. The Drupal installation will be available at: http://yourdomainname.com/subfolder.

How to use Drupal?

In this tutorial we will show you the basic actions you need to take in order to start a new Drupal-powered website.

How to start a Drupal site?

All you need to do is sign up for a hosting account where you can have the Drupal application installed. Here at SiteGround we offer a FREE Drupal installation! With our Professional Drupal hosting package you can start creating your site right away! If you already have a hosting account and would like to change your host, we offer free website transfer of your Drupal site.

How to install/enable Drupal modules

You can enable/disable Drupal Modules from the Drupal Administration area -> Modules section.
undefined
The default installation of Drupal has many useful modules, and there is a brief description of what each one of the modules does. If you need more modules, you can freely download them from the Drupal Modules official website.
On your site, Drupal modules are stored in the modules subfolder within the Drupal installation directory. You can install additional modules by simply unzipping them in that folder. Alternatively, you can use the Install new module functionality.

How to change the default Drupal theme?

How to change the default Drupal theme?

The default Drupal installation comes with several themes which can be changed from your administration area. Log in as an administrator,click on Administer -> Appearance and choose which theme you want to use for your website.

How to Manage Users in Drupal

You can manage users' rights from the Drupal Admin Section -> People.
People

How to optimize Drupal?

There are several steps that you should follow in order to improve the performance of your Drupal-based website:
First, you should enable the caching system of your Drupal application. In order to do this, login as administrator and go to the Administer -> Site Configuration -> Performance menu. In it, set the values of Caching Mode to "Normal" and Block Cache to "Enabled". Then, click on the "Save configuration" button at the bottom of the page.

Search Engine Friendly URLs

Don't have a Drupal website or have problems with your current host?Check out the best Drupal hosting service (including a free installation)! 

Here we will try to explain how you can enable the clean URLs in Drupal in three simple steps. All SiteGround servers fully support the Apache mod_rewrite module and all Drupal users hosted on our servers will be able to use the clean URLs option.
There are only 3 steps you need to follow to enable the Search Engine Friendly URLs.Here we assume that you already have Drupal installation for your account into the /drupal subfolder (www.yourdomainname.com/drupal) and you want to activate the clean URLs.
STEP 1Edit the .htaccess file in your Drupal directory.
Delete the entire content of the .htaccess file and insert the following lines into it:

Using Drupal Taxonomy to Post Content

Now that we have created the vocabulary and we have added terms to it, we can use it when posting content on the web site.

Access Control in Drupal CMS

The access control list in the Drupal's admin panel -> People -> Permissions is quite self-explanatory.
There you can modify the predefined permissions for the different user types (anonymous, authenticated and administrator).

How to Add A Free Live Chat in WordPress

There are some wonderful live chat options available for WordPress. However, most of them are paid and the free ones are not so great. Live chat can be used to answer customer queries, interact with visitors, provide support for products and services. In this article we will show you how to add free live chat in WordPress. We will look at some solutions that are free, reliable, and efficient.

How to Add a jQuery FAQ Accordion in WordPress

What is Accordion?

In web design, accordion is a term used for a user interface design pattern that has tabs or content blocks which collapse or expand upon user interaction. Each tab has content below them which expands when the user clicks on the menu item. In simple terms, it is like a menu that expands when you click on it. We have used a similar effect on our free WordPress blog setup page. Below is a screenshot of a sample accordion.

How to Add the Facebook Like Box / Fan Box in WordPress

Facebook like box also known as Facebook fan box has become a must have element for many website. It allows website owners to provide their users with an easy way to join their facebook community and get updates right in their Facebook news feed. Recently one of our users brought it to our attention that we have not covered the topic of how to add the facebook like box in WordPress. Although we have covered how to add the facebook like buttonfacebook send button, andfacebook comments. In this article, we will show you how to add the facebook fan box in WordPress.

How to Use Masonry to Add Pinterest Style Post Grid in WordPress

In this tutorial, I will show you how to use the popular Masonry JavaScript Library to create cascading grid layouts for your blog index, as well as archive pages for your theme. I will address a few issues that you need to consider for mobile-optimization and how to solve them.
Screenshot of Masonry Grid Layout in WordPress
 Note: This is an advanced level tutorial for those who feel comfortable editing WordPress themes and have sufficient HTML/CSS knowledge.

How to use Thumbnails with Previous and Next Post Links in WordPress

How to use thumbnails for previous/next post navigation in WordPress. The next_post_link and previous_post_link functions doesn’t have a simple enough thumbnail parameter which a new developer can simply turn on and off. In this article, we will show you how to use post thumbnails with previous and next post links in WordPress.
The final result would look like this:
Use Thumbnails with Previous and Next Post links in WordPress

Error: Server not Found

It happens. Sometimes we see this page when we try to load our site:
dreadpage1.5

Error: xml file is missing in package (joomla)

Receiving the “xml file is missing in package” error is common when installing a new template. This article contains a list of things you try to troubleshoot in order to find a solution for this error.
  • Try this first! Check whether or not the template you downloaded and installed is designed for the instance of Joomla! that you re using. For instance, if the template was created for Joomla! 1.5, you will absolutely not be able to install it on Joomla! 1.7, and vice versa.
  • If that doesn’t work, try this next! Another reason for this issue could be that the archive (or ZIP file) that you are trying to install contains the actual installation package (i.e. there is an archive within the archive). The solution is simple – you should extract the archive and install the actual installation package.
If you’re still having issues after troubleshooting, don’t hesitate to submit a support ticket in the Client Area.

URL Error: Numeric Values in URL (joomla)

How to delete a trashed Article

The first step is to delete any or all trashed Articles from the Article Manager. To do this, go to the Article Manager and select "Trashed" from the Status drop down menu item to view the "Trashed Articles". Click on the box next to the name of each Article, and click on the Empty trash button in the toolbar to delete each Article permanently. 
trashart3

Thursday, April 3, 2014

URL Error: Removing "index.php " from a URL

Rewrite engines are little pieces of software that rewrite URLs for different pages within a website in order to make the URLs more "relevant-looking" and representative of content on particular pages. Joomla! features a rewrite engine, and sometimes this engine adds "index.php" to the URL. The result is a URL that may look something like the following: 

http://www.yoursite.com/index.php/category/article

A lot of clients would prefer that "index.php" be removed from the URL so it looks cleaner like the following:

http://www.yoursite.com/category/article

This article offers steps to remove the "index.php" from the URL. There are two parts to the process: a few settings made in the Administration area (the back end) of the site, and some changes to one of the sites s primary folders. The second part will require the use of file transfer protocol (FTP). If you are unfamiliar with FTP, there are additional resources at the end of this document that can offer some guidance.

Global Configuration settings in the back end

Changes to the htaccess file using FTP

Related Resources

Global Configuration settings in the back end

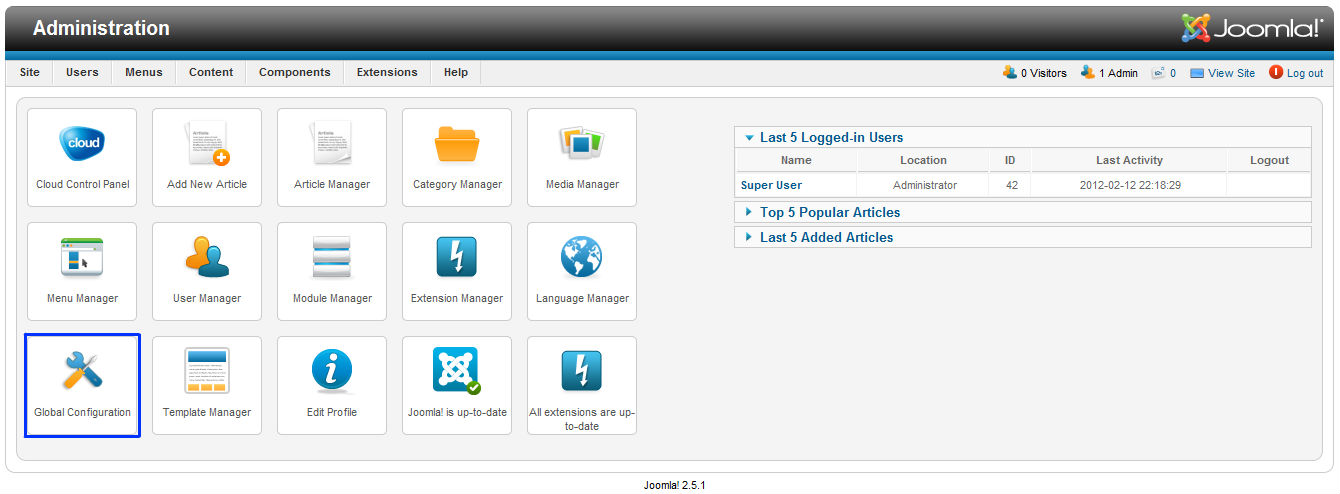
After logging into the back end of your site, go to Global Configurations.
index1

JCE: Missing JCE Editor (Joomla 2.5)

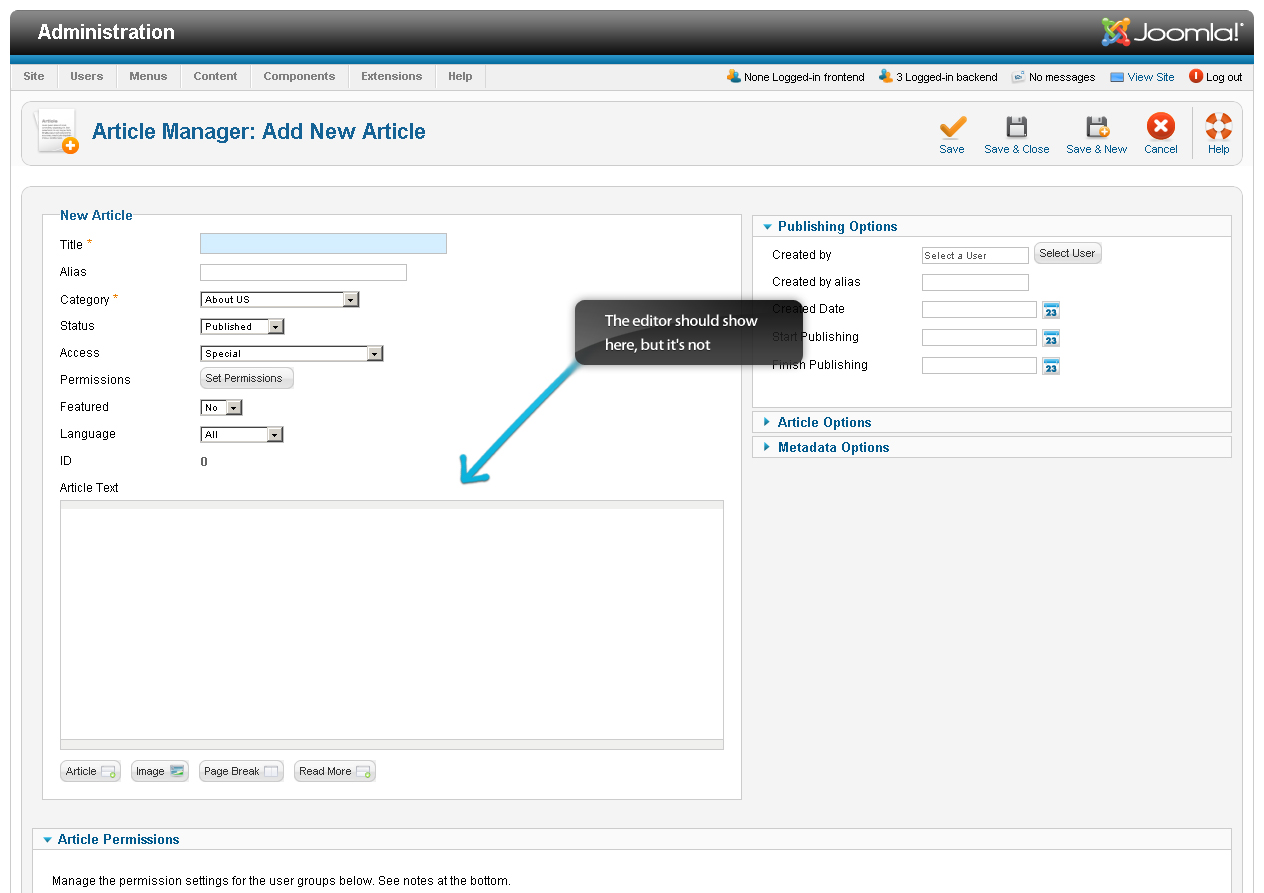
The Issue

Occasionally users will attempt to create a new article or edit an existing article, but the JCE Editor that they installed doesn t show up (as illustrated in the screenshot below).
jce1

Common htaccess rules

The htaccess file is an important configuration file that sits in the root directory of your Joomla Instance. The htaccess file can be used to override certain server configuration settings or provide or block access to the site or directories. It even has useful URL rewriting capabilities. Below you fill find common uses for the htaccess file.
IMPORTANT: Making modifications to the htaccess file can potentially disable or break your Joomla Instance. The CloudAccess.net Support Team does not provide troubleshooting outside of what is listed below.

Android Futures: Creating Android Apps For Google TV

Google IO 2011 took place in early May in San Francisco, California. In the midst of many announcements and tons of information, Android development for Google TV did get a little coverage. As of this writing, most developers cannot yet use Google TVs as a target device for development, but this is about to change. Developers looking to get a head start can follow a few easy tips and be ready when consumers can download applications for their TVs.
Existing Google TV devices are scheduled to be upgraded to Android 3.1, a Honeycomb variant, this summer (2011). The Android Market for Google TV will come with this upgrade, making this a hot new Android platform that developers want to prepare for. There are several key differences between Google TV devices and traditional, portable Android devices, such as phones and tablets. Most of the tips involve accounting for these differences.

Android Fundamentals: Status Bar Notifications

Often times, applications will perform some background operation—maybe while the app is running or maybe triggered on a scheduled alarm. The user won't know what's going on, though, unless they are informed of some event. Luckily, Android has an easy notification system that allows applications to display a message in the status bar and provide informative details to the user when something important occurs.
In this tutorial, we'll extend the existing unnamed "TutList" application to notify the user when the scheduled download of tutorials has taken place. When the user taps on the notification in the status bar, the application will be launched. This way, we use notifications to provide feedback to the user that something has happened, while also reminding he user of the existence of the application and that fresh content is available.

Android User Interface Design: Building Application Preference Screens

Many applications can benefit from Shared Preferences – the Android platform’s answer to the persistent storage of application settings. There are many ways to create user interfaces for collecting and displaying persistent settings for users. The easiest way is to use the PreferencesActivity, which provides a consistent look-and-feel with the rest of the platform, including the device system preferences. Learn how to use PreferencesActivity in this tutorial.

Our simple Mobiletuts tutorial feed reader application, which doesn't have an official name yet (we've been referring to it as TutList), needs better user control over the background updating process. Therefore, we'll add a single preference to help control the background updating.
This tutorial builds upon previous tutorials, including Android Essentials: Application Preferences and the continued series on our TutList activity with the most recent tutorial,Android Fundamentals: Scheduling Recurring Tasks. If you have trouble keeping up, feel free to post questions in the comment section -- many folks read and respond, including ourselves. Also, don't forget about the Android SDK reference.
The final sample code that accompanies this tutorial is available for download as open-source from the Google code hosting.

Android Fundamentals: Scheduling Recurring Tasks

Many applications have a need for regular, background actions to take place. For instance, in the "TutList" application we've been building over a recent series of tutorials, the content list is stale until the user initiates a refresh from the options menu. Why can't the application simply update its data at regular intervals? Well, it can and it should. Let's implement this new feature right now!
In our last tutorial, Android Fundamentals: Downloading Data With Services, you learned how to download data off the UI thread and independent of any particular activity. This is an efficient way to download data, while avoiding duplicate downloads and restarts. Now you're going to learn how to download content without the user even asking.

Android Fundamentals: Downloading Data With Services

The tutorial content of the still-unnamed "TutList" application we've been building together is getting stale. The data has been the same for over a month now. It's time to breathe some life into the application by providing it with a means to read fresh Mobiletuts tutorial data on the fly.
As it stands now, our application reads a list of tutorial titles and links from a database. This is, fundamentally, the correct way to design the app. However, we need to add a component that retrieves new content from the Mobiletuts website and stores new titles and links in the application database. This component will download the raw RSS feed from the site, parse it for the title and link, then store that data into the database. The database will be modified to disallow duplicate links. Finally, a refresh option will be placed within the list fragment so the user can manually force an update of the database.
As with other tutorials in this series, the pacing will be faster than some of our beginner tutorials; you may have to review some of the other Android tutorials on this site or even in the Android SDK reference if you are unfamiliar with any of the basic Android concepts and classes discussed in this tutorial. The final sample code that accompanies this tutorial is available for download as open-source from the Google code hosting.

Android Fundamentals: Properly Loading Data

The UI thread is a bad place for lengthy operations like loading data. You never know how long data will take to load, especially if that data is sourced from a content provider or the network. Android 3.0 (Honeycomb) introduced the concept of Loaders and, in particular, the CursorLoader class that offloads the work of loading data on a thread, and keeps the data persistent during short term activity refresh events, such as an orientation change. We'll incorporate the Loader as a new feature in our ongoing tutorial series building a yet-to-be-named tutorial reader application.
If you were paying close attention to our last tutorial, Android Fundamentals: Working With Content Providers, you may have noticed that we took a shortcut. We used the managedQuery() method of the Activity class, which is a newly deprecated method. This method represents the "old" way of letting an activity manage a cursor. Now we'll switch it to the new way, using a CursorLoader, as suggested in the latest SDK documentation. We can do this safely because although the CursorLoader class was included in Android 3.0, it is also part of the new compatibility library we discussed in Android Compatibility: Working with Fragments, and therefore can be used on devices as far back as Android 1.6.

Android Fundamentals: Working With Content Providers

The TutList application that we've been working with has a pretty big flaw right now: the article data is not “live”, but static content. In this tutorial, you take several more steps towards a flexible and expandable solution by modifying the application to act as a data-backed content provider.

The Android framework uses a concept called content providers to enable applications to share and use data across the platform. Typically, a provider is backed by a SQLite database where the underlying data is stored. The current state of the TutList application is such that it gets the data for the ListView from static string arrays in the resources. In this tutorial, we'll remove those fixed data resources and build a flexible database-driven content provider in their place. You'll see that the user interface code won't change much. The back-end, however, will get more complex. The advantage here is that when we finally switch the application over to retrieving live data from the Internet, we'll have a place to store and manage it easily.
The pacing of this tutorial will be faster than some of our beginner tutorials; you may have to review some of the other Android tutorials on this site or even in the Android SDK reference if you are unfamiliar with any of the basic Android concepts and classes discussed in this tutorial. You can read the SQLite Crash Course for Android Developers tutorial to refresh your SQLite knowledge. The final sample code that accompanies this tutorial is available for download as open-source from the Google code hosting.

Android SDK: Achieving Movement

In this tutorial, we will run through a quick guide on how to achieve object movement, one of the foundations of game development. We won't be doing anything fancy, just bouncing a ball across the screen. However, the principles in this tutorial can be easily applied in many more complex scenarios. Without further delay, let's jump right in!

Android Compatibility: Working with Fragments

Android 3.0, or Honeycomb, came with some fundamental user interface changes, most notably in the form of the Fragment API. When you were reading the last tutorial on how to use fragments, you were probably thinking, "Wow, this is great, but I can't use any of this because I need to target more than just the Motorola Xoom, the only Android 3.0 device currently on the market." Luckily for all of us developers, Google has released a library called the Android Compatibility package. This package provides support for the Fragment API as well as other key new features to devices as far back as Android 1.6. As of this writing, that covers 97% of all Android devices actively accessing the Android Market. Learn how to use it in this quick tip.
The final sample code that accompanies this tutorial is available for download as open-source from the Google code hosting.

Android User Interface Design: Working With Fragments

The new Fragment API for Android, introduced in Android 3.0, allows for easier dynamic user interfaces. In this tutorial, learn how to convert a two-screen ListView to WebView workflow into a single screen workflow designed for large screens, such as those found on tablets.
Subsequent Changes to Techniques & Software
Certain aspects of applications or techniques used in this tutorial have changed since it was originally published. This might make it a little difficult to follow along. We'd recommend looking at these more recent tutorials on the same topic:
  • Android SDK: Using Fragments
The pacing of this tutorial is going to be faster than some of our beginner tutorials; you may have to review some of the other Android tutorials on this site or even in the Android SDK reference if you are unfamiliar with any of the basic Android concepts and classes discussed in this tutorial. The final sample code that accompanies this tutorial is available for download as open-source from the Google code hosting.

Android SDK Tools: Layout Optimization

Creating Android layouts that look good can be challenging. Once you’ve spent hours tweaking them to suit multiple devices, you often won't want to revisit them. However, bulky, nested layouts can be tremendously inefficient. Luckily, there’s a tool available in the Android SDK that can help optimize your project layouts to decrease memory usage and improve performance.

Optimization is always tricky business. Having good, well behaved, high performance code is great. But at what cost? You never want to prematurely optimize or spend too much time on code that may only run once or is in a short-lived feature. On the flip-side, if your application is unresponsive, takes up too much memory, or slows down the rest of the system users will notice and your application downloads will likely suffer.
Optimizing your layouts fairly early in the development process is one easy way to save memory and increase performance. Some changes will be negligible, others may be quite noticeable. The Android SDK comes with a tool to automatically analyze your layouts and find potential areas of unnecessary layout complexity.

Android User Interface Design: Building a ListView Application

The ListView is one of the most useful view controls available on the Android platform for the display of variable amounts of data. In this Mobiletuts+ tutorial, we'll show you how to use a ListView to browse a list of articles!

Over the last several months, you've seen many tutorials covering various layout controls. You'll use several of these in conjunction with a ListView in today’s tutorial. The application itself will be very simple: it will display a list of article titles which, when clicked, display the article's content. The pacing of this tutorial is going to be faster than some of our beginning tutorials; you may have to review some of our other tutorials on this site or even in the Android API reference if you are unfamiliar with basic Android controls or concepts. The final open-source code is available for download on Google code hosting.

Working with UITableView in Xcode 5 Using Storyboard

When we first started the iOS programming course, we wrote a tutorial about UITableView and showed you how tocreate a simple table app using UITableView. This is one of our most popular tutorials. However, you may find it no longer works in Xcode 5. The latest version of Xcode promotes the use of Storyboard over Interface Builder. Storyboard is no longer an option when creating a new Xcode project. It’s the default. This is one of the reasons why you couldn’t follow the steps in the UITableView tutorial to create the app.
Anyway, we decide to completely update the table view tutorial for Xcode 5 and iOS 7. And here you are.
Enter the UITableView tutorial.
First, what’s a Table View in iPhone app? Table view is one of the common UI elements in iOS apps. Most apps, in some ways, make use of Table View to display list of data. The best example is the built-in Phone app. Your contacts are displayed in a table view. Another example is the Mail app. It uses Table View to display your mail boxes and emails. Not only designed for showing textual data, Table View allows you to present the data in the form of images. The YouTube and Airbnb apps are great examples for the usage.


Sample UITableView
undefined

Creating a SimpleTable Project

With an idea of table view, let’s get our hands dirty and create a simple app. Don’t just read the tutorial if you’re serious about learning iOS programming. Stop reading, open your Xcode and code! This is the best way to study programming.
Once launched Xcode, create a new project using the “Single View application” temple.
Xcode Project Template Selection
Click “Next” to continue. Again, fill in all the required options for the Xcode project:
Product Name: SimpleTable – This is the name of your app.
Company Identifier: com.appcoda – It’s actually the domain name written the other way round. If you have a domain, you can use your own domain name. Otherwise, you may use mine or just fill in “edu.self”.
Class Prefix: SimpleTable – Xcode uses the class prefix to name the class automatically. In future, you may choose your own prefix or even leave it blank. But for this project, let’s keep it simple and set it to “SimpleTable”.
Device Family: iPhone – Just use “iPhone” for this project.
SimpleTable Project Options
Click “Next” to continue. Xcode then asks you where you saves the “SimpleTable” project. Pick any folder (e.g. Desktop) to save your project. As before, deselect the option for Source Control. Click “Create” to continue. Simply pick a folder to save your project. As you confirm, Xcode automatically creates the “SimpleTable” project based on the options you’ve provided. The resulting screen looks like this:
Main Screen of SimpleTable Project

Designing the View

First, we’ll create the user interface and add the table view. Select Main.storyboard to switch to the Storyboard interface.
Storyboard for SimpleTable Project
In the Object Library, select the “Table View” object and drag it into the view.
Drag a Table View from Object Library and add it to the view
Resize its height a little bit, so that it doesn’t cover the status bar. Your screen should look like below after inserting the table view.
Drag a table view from Object Library

Run Your App for the First Time

Before moving on, try to run your app using the Simulator. Click the “Run” button to build your app and test it.
The Simulator screen will look like this:

SimpleTable App running in the simulator
Easy, right? You already designed the table view in your app. For now, however, it doesn’t contain any data. Next up, we’ll write some code to add the table data.

Adding Table Data

Go back to the Project Navigator and select “SimpleTableViewController.h”. Append “<uitableviewdelegate, uitableviewdatasource="">” after “UIViewController”. Your code should look like below:
1
2
3
4
5
#import <UIKit/UIKit.h>

@interface SimpleTableViewController : UIViewController <UITableViewDelegate, UITableViewDataSource>

@end
The “UITableViewDelegate” and “UITableViewDataSource” are known as protocol in Objective-C. Basically, in order to display data in Table View, we have to conform to the requirements defined in the protocols and implement all the mandatory methods.

UITableViewDelegate and UITableViewDataSource

Earlier, we’ve added the “UITableViewDelegate” and “UITableViewDataSource” protocols in the header file. It may be confusing. What’re they?
The UITableView, the actual class behind the Table View, is designed to be flexible to handle various types of data. You may display a list of countries or contact names. Or like this example, we’ll use the table view to present a list of recipes. So how do you tell UITableView the list of data to display? UITableViewDataSource is the answer. It’s the link between your data and the table view. The UITableViewDataSource protocol declares two required methods (tableView:cellForRowAtIndexPath and tableView:numberOfRowsInSection) that you have to implement. Through implementing these methods, you tell Table View how many rows to display and the data in each row.
UITableViewDelegate, on the other hand, deals with the appearance of the UITableView. Optional methods of the protocols let you manage the height of a table row, configure section headings and footers, re-order table cells, etc. We do not change any of these methods in this example. Let’s leave them for the later tutorial.
Okay, let’s continue to code the app. Select “SimpleTableViewController.m” and define an instance variable for holding the table data.
1
2
3
4
@implementation SimpleTableViewController
{
    NSArray *recipes;
}
In the viewDidLoad: method, add the following code to declare the “recipes” array. We initialize an array with a list of recipes.
1
2
3
4
5
6
- (void)viewDidLoad
{
    [super viewDidLoad];
    // Initialize table data
    recipes = [NSArray arrayWithObjects:@"Egg Benedict", @"Mushroom Risotto", @"Full Breakfast", @"Hamburger", @"Ham and Egg Sandwich", @"Creme Brelee", @"White Chocolate Donut", @"Starbucks Coffee", @"Vegetable Curry", @"Instant Noodle with Egg", @"Noodle with BBQ Pork", @"Japanese Noodle with Pork", @"Green Tea", @"Thai Shrimp Cake", @"Angry Birds Cake", @"Ham and Cheese Panini", nil];
}

What is an array?

An array is a fundamental data structure in computer programming. You can think of an array as a collection of data elements. Consider the recipes array in the above code, it represents a collection of textual elements. You may visualize the array like this:
recipes array
Each of the array elements is identified or accessed by an index. An array with 10 elements will have indices from 0 to 9. That means, recipes[0] returns the first element of the “recipes” array.
In Objective C, NSArray is the class for creating and managing array. You can use NSArray to create static array for which the size is fixed. If you need a dynamic array, use NSMutableArray instead.
NSArray offers a set of factory methods to create an array object. In our code, we use “arrayWithObjects” to instantiate a NSArray object and preload it with the specific elements (e.g. Hamburger).
You can also use other built-in methods to query and manage the array. Later, we’ll call the “count” method to query the number of data elements in the array. To learn more about the usage of NSArray, you can always refer to Apple’s official document.
Finally, we have to add two datasource methods: tableView:numberOfRowsInSection and tableView:cellForRowAtIndexPath. These two methods are part of the UITableViewDataSource protocol. It’s mandatory to implement the methods when configuring a UITableView. The first method is used to inform the table view how many rows are in the section. So let’s add the below code. The count: method simply returns the number of items in the “tableData” array.
1
2
3
4
- (NSInteger)tableView:(UITableView *)tableView numberOfRowsInSection:(NSInteger)section
{
    return [recipes count];
}
Next, we implement the other required methods.
1
2
3
4
5
6
7
8
9
10
11
12
13
- (UITableViewCell *)tableView:(UITableView *)tableView cellForRowAtIndexPath:(NSIndexPath *)indexPath
{
    static NSString *simpleTableIdentifier = @"SimpleTableCell";

    UITableViewCell *cell = [tableView dequeueReusableCellWithIdentifier:simpleTableIdentifier];

    if (cell == nil) {
        cell = [[UITableViewCell alloc] initWithStyle:UITableViewCellStyleDefault reuseIdentifier:simpleTableIdentifier];
    }

    cell.textLabel.text = [recipes objectAtIndex:indexPath.row];
    return cell;
}
The cellForRowAtIndexPath: method is called every time when a table row is displayed. The below illustration will give you a better understanding about how UITableView and UITableDataSource work.
How UITableView and UITableDataSource work together
Okay, let’s hit the “Run” button and try out your final app. Oops! you still got a blank app! It’s the same as before.
Why is it still blank? We’ve already written the code for generating the table data and implemented the required methods. But why the Table View isn’t shown up as expected?
There is still one thing left.

Connecting the DataSource and Delegate

Like the “Hello World” button in the first tutorial, we have to establish the connection between the Table View and the two methods we just created.
Go back to the Main.storyboard. Select the table view. Press and hold the control key on your keyboard, click the table view and drag to the “Simple Table View Controller” icon of the dock. Your screen should look like below:
Connecting Table View with its Datasource and Delegate
Release both buttons and a pop-up shows both dataSource & delegate. Select “dataSource” to make a connection between the Table View and its data source. Repeat the above steps and make a connection with the delegate.
Connect dataSource and delegate
That’s it. To ensure the connections are linked properly, you can select the Table View again. In the upper part of the Utility area, you can reveal the existing connections in the “Connection Inspector” (i.e. the rightmost tab).
Show the Connections Inspector

Test Your App

Finally, it’s ready to test your app. Simply hit the “Run” button and let the Simulator load your app:

Simple Table View App

Add Thumbnail to Your Table View

The table view is too plain, right? What about adding an image to each row? The iOS SDK makes it extremely easy to do this. You just need to add a line of code for inserting a thumbnail for each row.
First, download this sample image. Alternatively, you can use your own image but make sure you name it “creme_brulee.jpg”. In Project Navigator, right-click the “SimplyTable” folder and select “Add Files to SimpleTable…”.

Show the Connections Inspector
Select the image file you just downloaded and check “Copy items to destination group’s folder” checkbox. By selecting the option, the image will be copied to the project folder. Click “OK” to add the file.
Pick your image file and add to the project
Now edit the SimpleTableViewController.m. Add the following line of code in “tableView:cellForRowAtIndexPath” method and put it right before “return cell”:
1cell.imageView.image = [UIImage imageNamed:@"creme_brelee.jpg"];
Your code should look like this after editing:
1
2
3
4
5
6
7
8
9
10
11
12
13
14
15
- (UITableViewCell *)tableView:(UITableView *)tableView cellForRowAtIndexPath:(NSIndexPath *)indexPath
{
    static NSString *simpleTableIdentifier = @"SimpleTableCell";
   
    UITableViewCell *cell = [tableView dequeueReusableCellWithIdentifier:simpleTableIdentifier];
   
    if (cell == nil) {
        cell = [[UITableViewCell alloc] initWithStyle:UITableViewCellStyleDefault reuseIdentifier:simpleTableIdentifier];
    }
   
    cell.textLabel.text = [recipes objectAtIndex:indexPath.row];
    cell.imageView.image = [UIImage imageNamed:@"creme_brelee.jpg"];
   
    return cell;
}
The table view cell comes with a default property for showing image. The line of code simply loads the image and display it in the image area of the table cell. Now, hit the “Run” button again and your SimpleTable app should display the image in each row.

Simple Table View App

Summary

It’s simple to create a table view, right? Table view is one of the most commonly used elements in iOS programming. If you’ve followed the tutorial and build the app, you should have a basic idea about how to create the table view. I try to keep everything simple in the demo app. In reality, the table data will not be stored directly in the code. Usually, it’s loaded from file, database or somewhere else. In later tutorials, you’ll learn how to store and load the table data from a file. But before moving on, make sure you thoroughly understand how the table view works. Otherwise, go through the tutorial again.

The Fast, Secure and Professional PHP Framework with yiiframework

About Yii

Yii is a high-performance PHP framework best for developing Web 2.0 applications.
Yii helps Web developers build complex applications and deliver them on-time.
Yii is pronounced as Yee or [ji:], and is an acroynym for "Yes It Is!". This is often the accurate, and most concise response to inquires from those new to Yii:
Is it fast? ... Is it secure? ... Is it professional? ... Is it right for my next project? ... Yes, it is!
undefined
Yii is a free, open-source Web application development framework written in PHP5 that promotes clean, DRY design and encourages rapid development. It works to streamline your application development and helps to ensure an extremely efficient, extensible, and maintainable end product.
Being extremely performance optimized, Yii is a perfect choice for any sized project. However, it has been built with sophisticated, enterprise applications in mind. You have full control over the configuration from head-to-toe (presentation-to-persistence) to conform to your enterprise development guidelines. It comes packaged with tools to help test and debug your application, and has clear and comprehensive documentation.
To learn more about what Yii brings to the table, check out the features section.

History

Yii is the brainchild of its founder, Qiang Xue, who started the Yii project on January 1, 2008. Qiang previously developed and maintained the Prado framework. The years of experience gained and developer feedback gathered from that project solidified the need for an extremely fast, secure and professional framework that is tailor-made to meet the expectations of Web 2.0 application development. On December 3, 2008, after nearly one year's development, Yii 1.0 was formally released to the public.
Its extremely impressive performance metrics when compared to other PHP-based frameworks immediately drew very positive attention and its popularity and adoption continues to grow at an ever increasing rate.

Credits

Yii incorporates many ideas and work from other well-known Web programming frameworks and applications. Below is a short list of those from which Yii drew inspiration.
  • Prado: This is the major source of ideas for Yii. Yii adopts its component-based and event-driven programming paradigm, database abstraction layers, modular application architecture, internationalization and localization, and many of its other features and patterns.
  • Ruby on Rails: Yii inherits its spirit of convention over configuration. Yii also referenced its implementation of the active record design pattern for its ORM layer.
  • jQuery: This is integrated in Yii as the foundational JavaScript framework.
  • Symfony: Yii referenced its filter design and plug-in architecture.
  • Joomla: Yii referenced its modular design and message translation scheme.
undefined
undefined
Rate this blog entry:
0
1
2
3
4
5
6
7
8
9